First steps
Once you have a Planforge account and are logged in, you will see that the application is divided into three main parts.
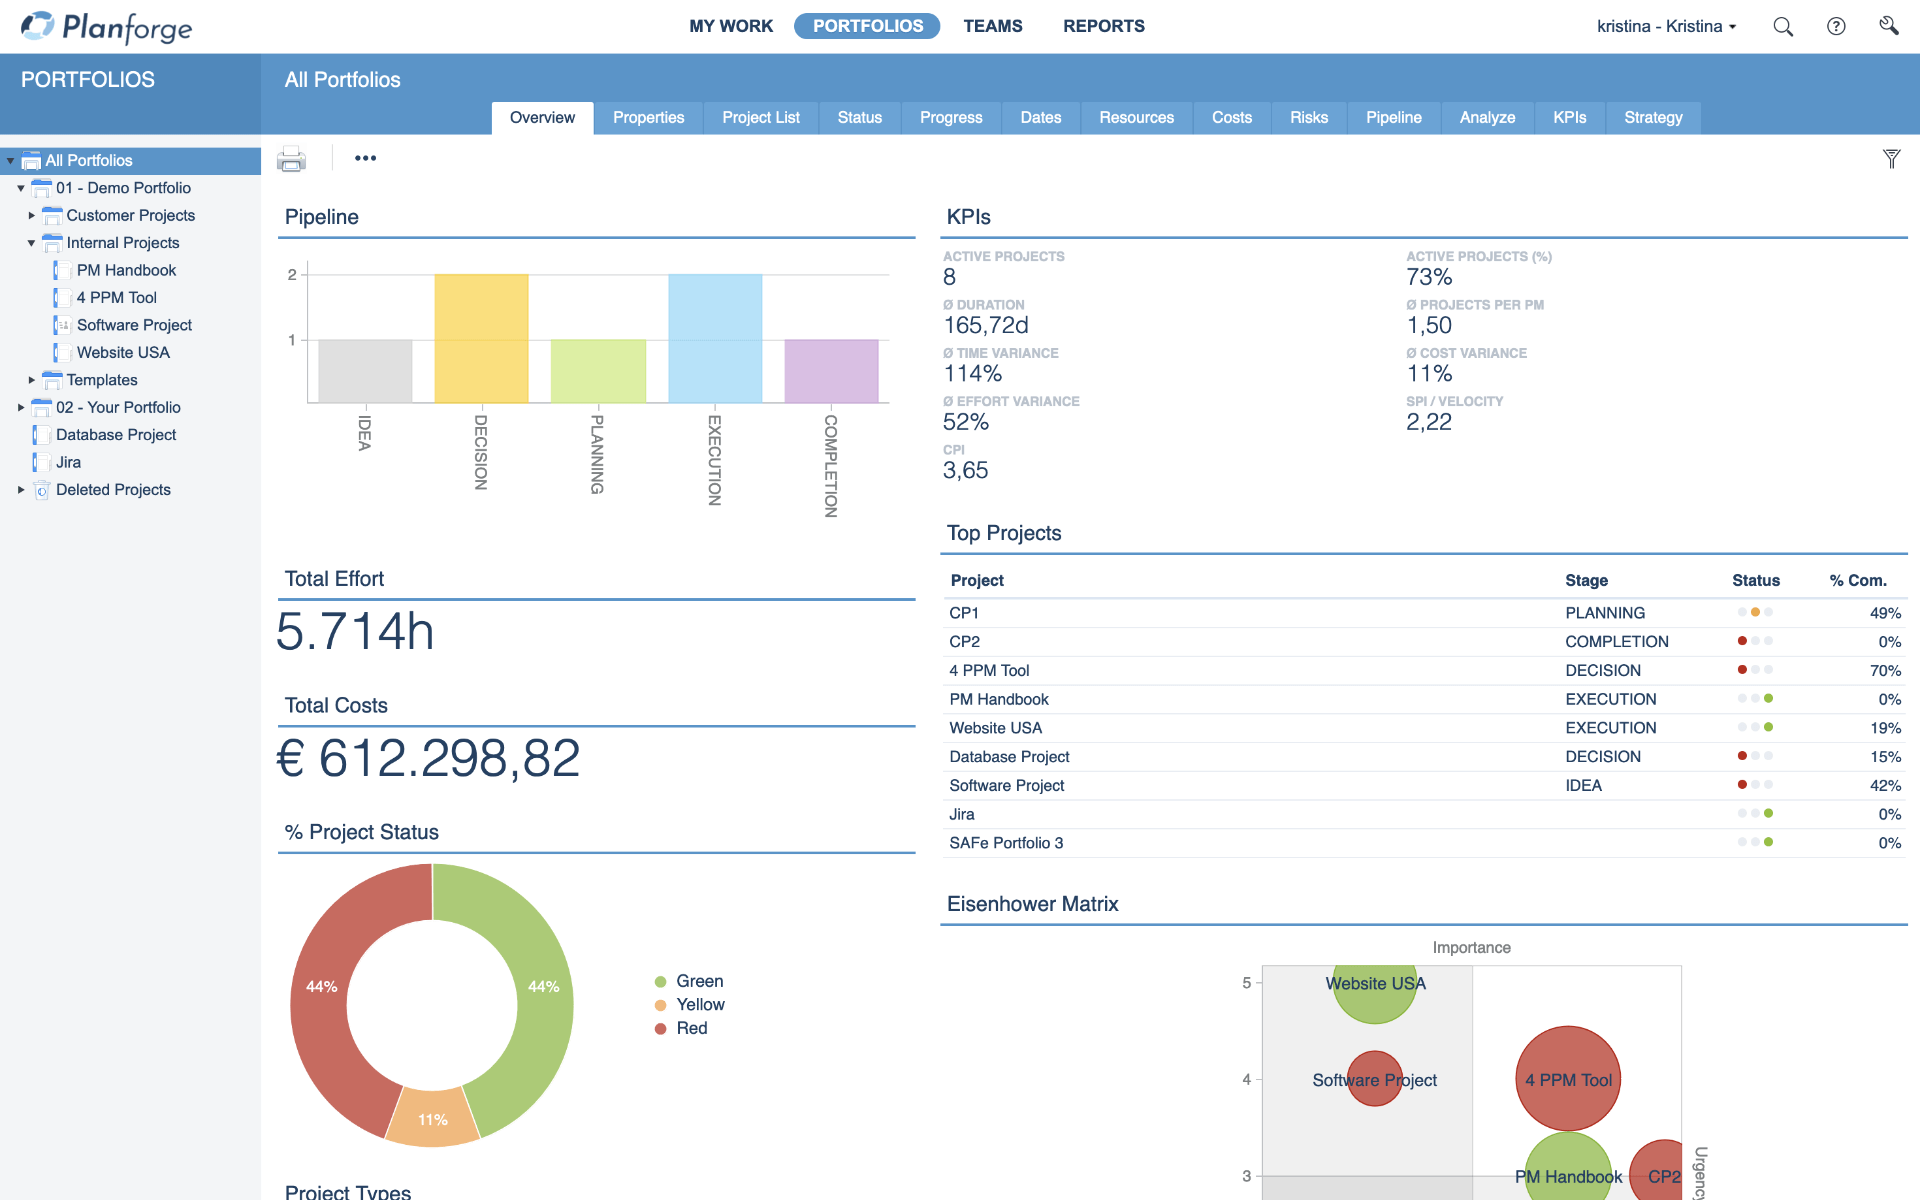
At the top you have a navigation area for accessing the different tool groups. For the tool groups PORTFOLIOS, TEAMS and REPORTS a navigation tree is available on the left-hand side, allowing you to select what is displayed to the right. The main area in the center of the screen shows you the overview and detailed views of the above selected tool group.
To get started with project management in Planforge, we recommend that you follow the first basic steps described below.
1 Create or import resources
First you will want to create resources in the system to be able to assign activities to them later on.
-
Go to the TEAMS tool group and click
 New
to create a
New
to create a
 Resource
. You can also group several resources together in a team by creating a new
Resource
. You can also group several resources together in a team by creating a new
 Team.
Team.
-
Enter a unique name for the team or resource.
- If you also want to create a new user for the resource and invite them to Planforge, activate the checkbox Allow login and enter an email address.
-
Click
 Save
.
Save
.
-
You can also import resources from an Excel file by clicking the
 Import
button.
Import
button.
To download a template for creating a file for import, click the
![]() Import
button while simultaneously pressing the
Alt
-key.
Import
button while simultaneously pressing the
Alt
-key.
2 Create or import projects
Now you can create projects in Planforge.
-
Go to the Overview tab in the PORTFOLIOS tool group and click
New
to create a
 Project.
You can also group several projects together in a portfolio by creating a new
Project.
You can also group several projects together in a portfolio by creating a new
 Portfolio
.
Portfolio
.
- Enter a unique name for the project or portfolio. For projects a start date is also required.
-
Click
Save
. You can specify other parameters and assign a project team at a later point in time.
-
You can also import projects
from an Excel file by clicking
the
 Import
button.
Import
button.
To download a template for creating a file for import, click the
![]() Import
button while simultaneously pressing the
Alt
-key.
Import
button while simultaneously pressing the
Alt
-key.
3 Plan your project
How you go about planning your projects depends on which project management methodology you are using. The different planning views automatically synchronize so that you are always up-to-date, no matter where you enter your data first.
3.1 Simple projects
Simple projects are reduced to the most basic functionalities. This is similar to project management using spreadsheets, where you track resources and costs in two cross-classified tables.
- Plan your project content using to-dos.
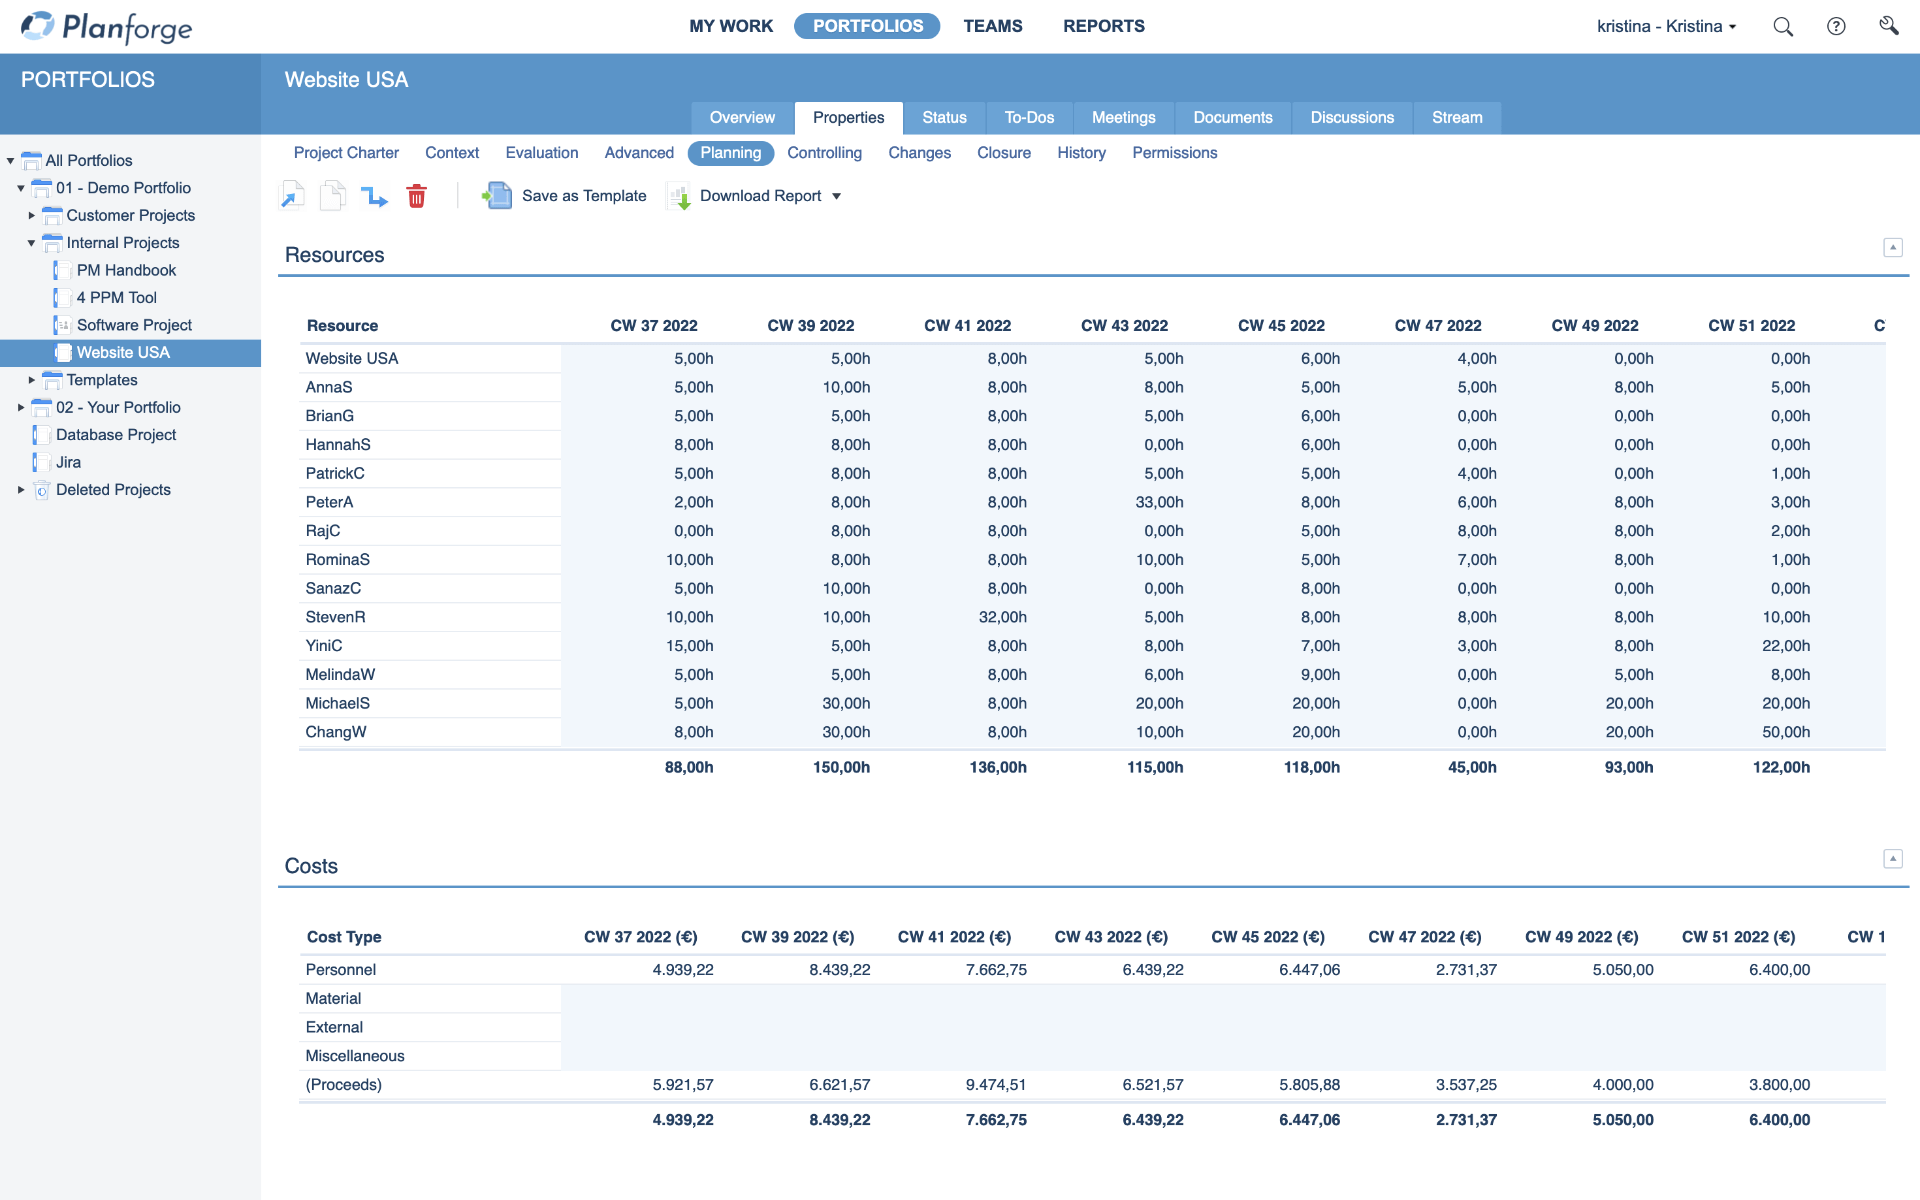
- Plan overall effort and project costs on a monthly basis in the Planning view on the project's Properties tab.
- Track time for each project individually.
- Manage resources and costs from the Controlling view on the project's Properties tab:
3.2 Agile (Scrum) Projects
Agile projects offer more than just simple planning via to-dos:
-
Go to the Planning tab in your newly created project. Under Epics you can
 Draw epics
and
Draw epics
and
 Dr
aw stories
using the tools in the toolbar at the bottom. You can also create them from the Stories tab.
Dr
aw stories
using the tools in the toolbar at the bottom. You can also create them from the Stories tab.
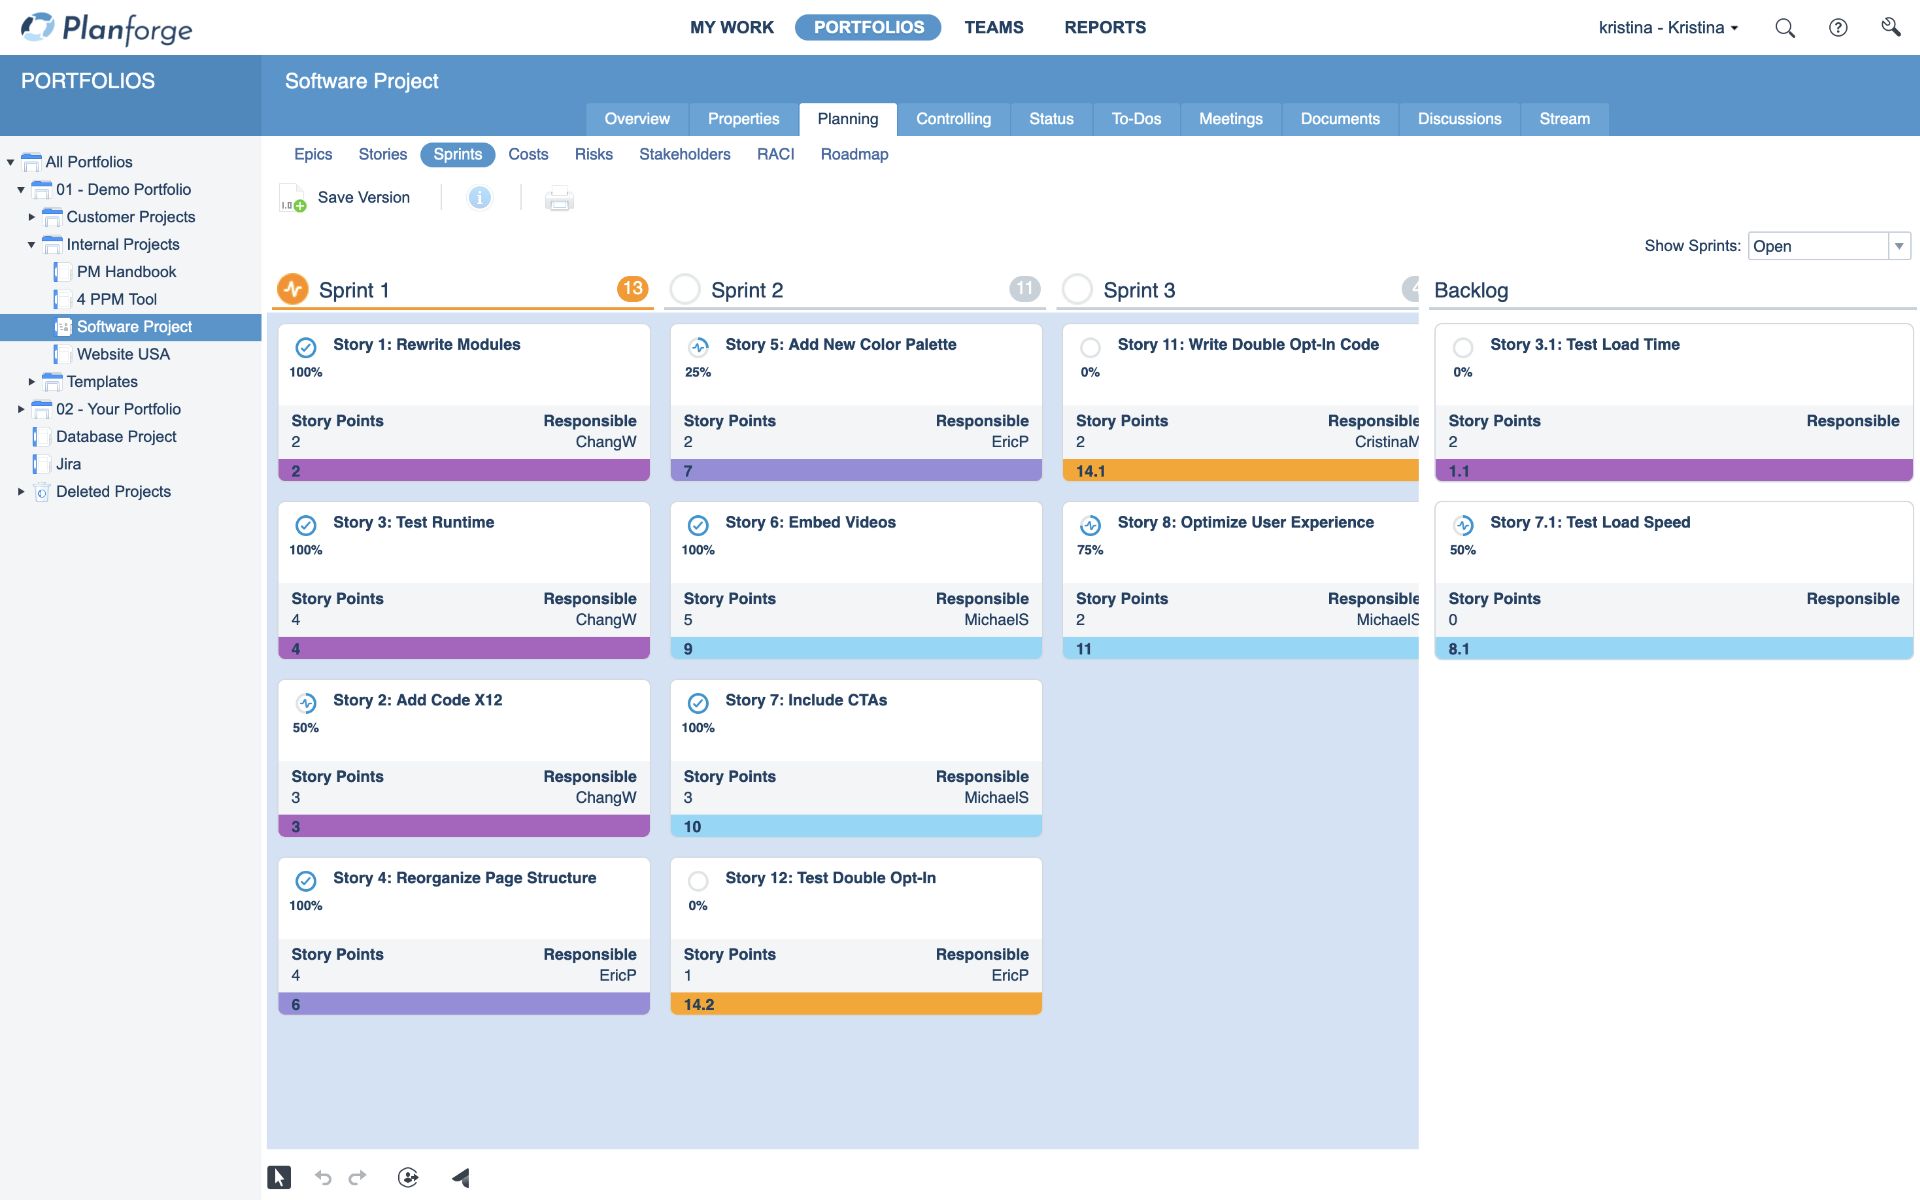
- Newly created stories are automatically added to the backlog in the Sprints view, where you can allocate them to different sprints using drag and drop. This enables you to plan several sprints ahead. The background colors of the sprint columns indicate the utilization of the sprint team from low (blue) to critical (red).
-
In agile planning your plan version can be edited any time while staying available to other users and always being up-to-date. Click
 Save version
if you want to save a snapshot of your current version to the change history.
Save version
if you want to save a snapshot of your current version to the change history.
3.3 ART (SAFe) projects
ART (SAFe) projects allow you to scale your agile projects up. As such they contain multiple Agile (Scrum) projects, which are treated as agile teams in the ART.
-
Go to the Project Charter of your ART and click
 in the top left to add new agile teams.
-
Or go to the Features view in the Planning tab and click
 Include Agile Team to add existing agile teams.
-
In the Planning tab, go the Capabilities view. Use the tools in the toolbar at the bottom to create and edit new activities. A click on
 Draw capabilities
or
Draw capabilities
or
 Draw features
displays insertion markers, on which you can click to add new activities. You can move them using drag and drop. You can also add activities in a tabular view in the Features view. Don't forget to assign Story Points to your features!
Draw features
displays insertion markers, on which you can click to add new activities. You can move them using drag and drop. You can also add activities in a tabular view in the Features view. Don't forget to assign Story Points to your features!
-
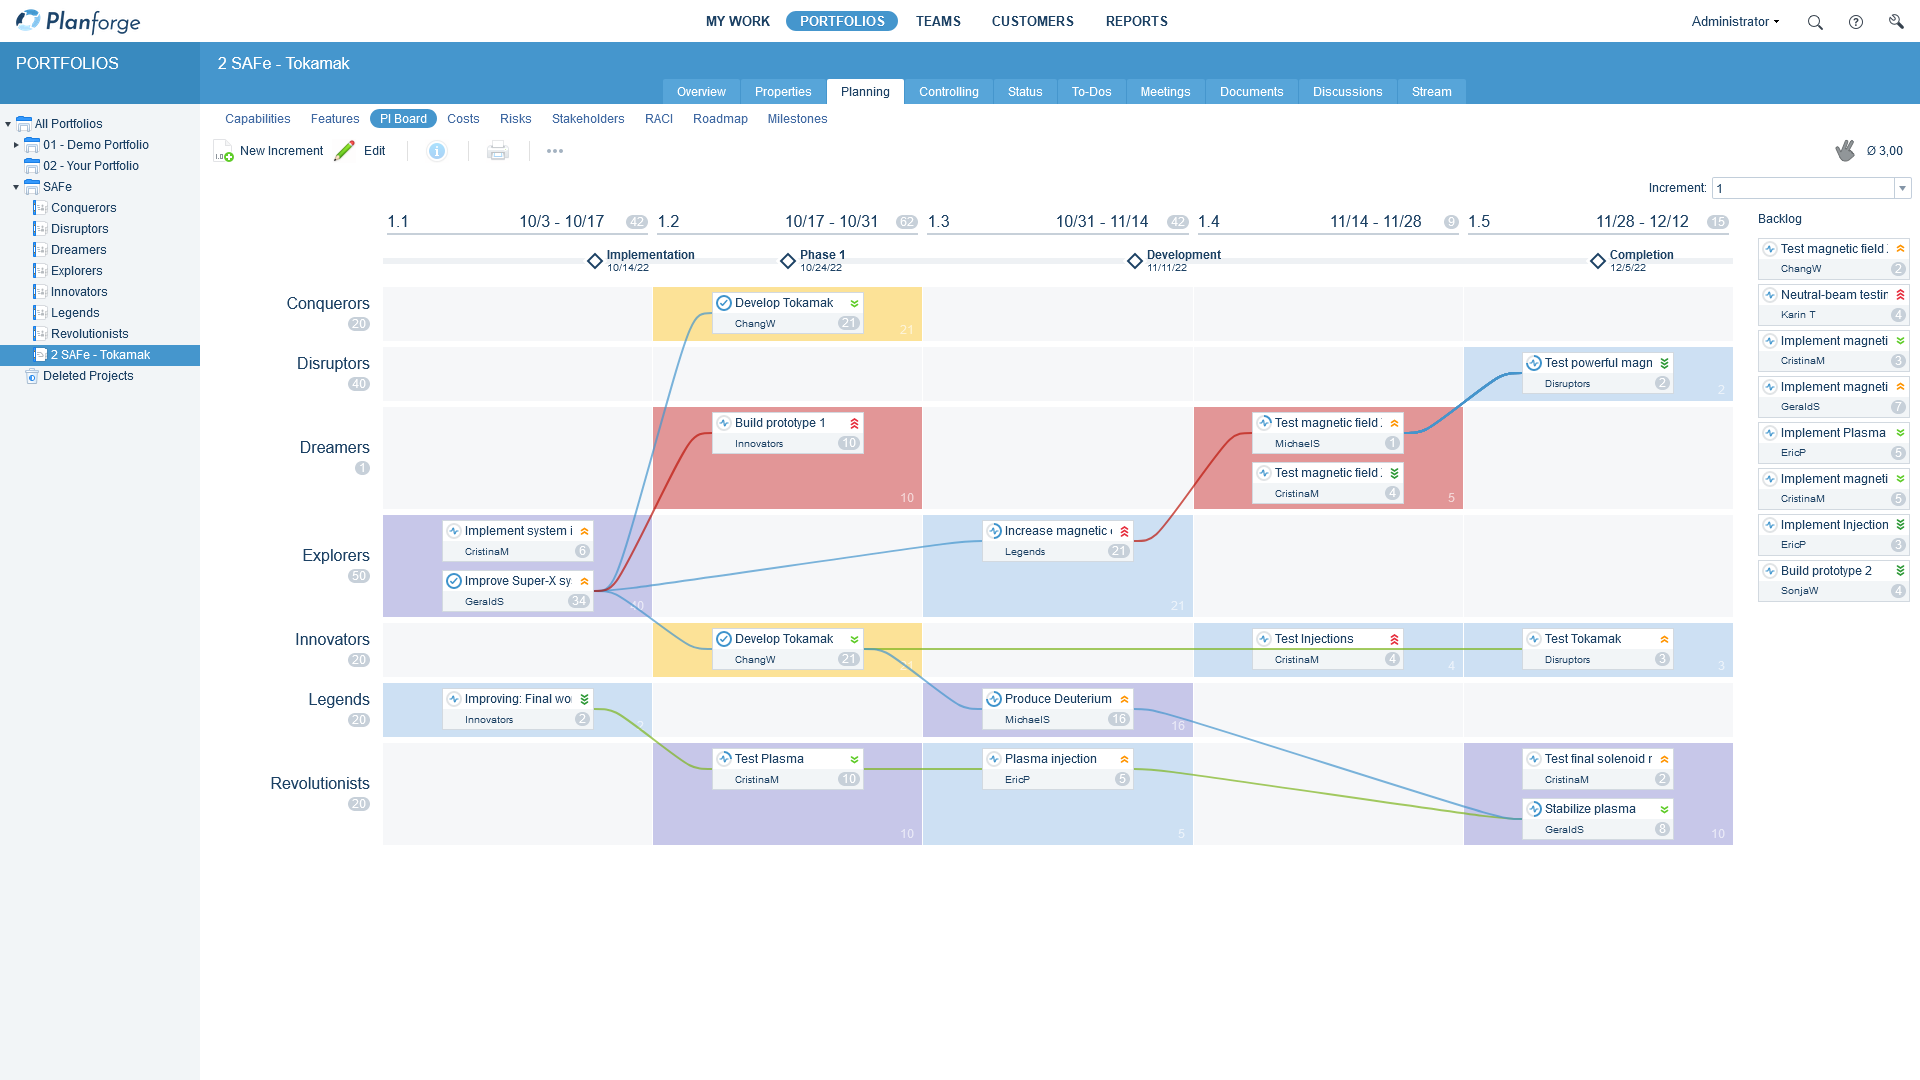
The PI Board view is your central planning tool in an ART. Simply drag features from the backlog to the desired team and iteration. A click on
 Draw connections
lets you draw dependencies between features. After assigning features, the team can vote on the PI Board by clicking the hand symbol
Draw connections
lets you draw dependencies between features. After assigning features, the team can vote on the PI Board by clicking the hand symbol
 . Assigned features are automatically mirrored as epics to the respective team's Agile (Scrum) project, where you can assign them to individual resources.
3.4 Traditional projects
Traditional projects offer the full range of planning tools.
-
Go to the Planning tab in your newly created project. Click
 Edit
under Work Breakdown Structure to create a project plan. Use the tools in the toolbar at the bottom to create and edit new activities and milestones. A click on
Draw activities
Edit
under Work Breakdown Structure to create a project plan. Use the tools in the toolbar at the bottom to create and edit new activities and milestones. A click on
Draw activities
 or
Draw milestones
or
Draw milestones
 displays blue insertion markers, on which you can click to add new activities or milestones. You can move them using drag and drop.
- The Schedule view gives you an overview of activities and milestones over time and allows you to rearrange and modify them.
- The Utilization view shows you the utilization of all team members for specific time periods.
-
Click
Save
to save the changes made to your working copy of the project plan, OR
-
 Check-in
your plan version to make it available to all users. All controlling data are recalculated, and the planned tasks will appear in the personal task lists of linked users.
Check-in
your plan version to make it available to all users. All controlling data are recalculated, and the planned tasks will appear in the personal task lists of linked users.
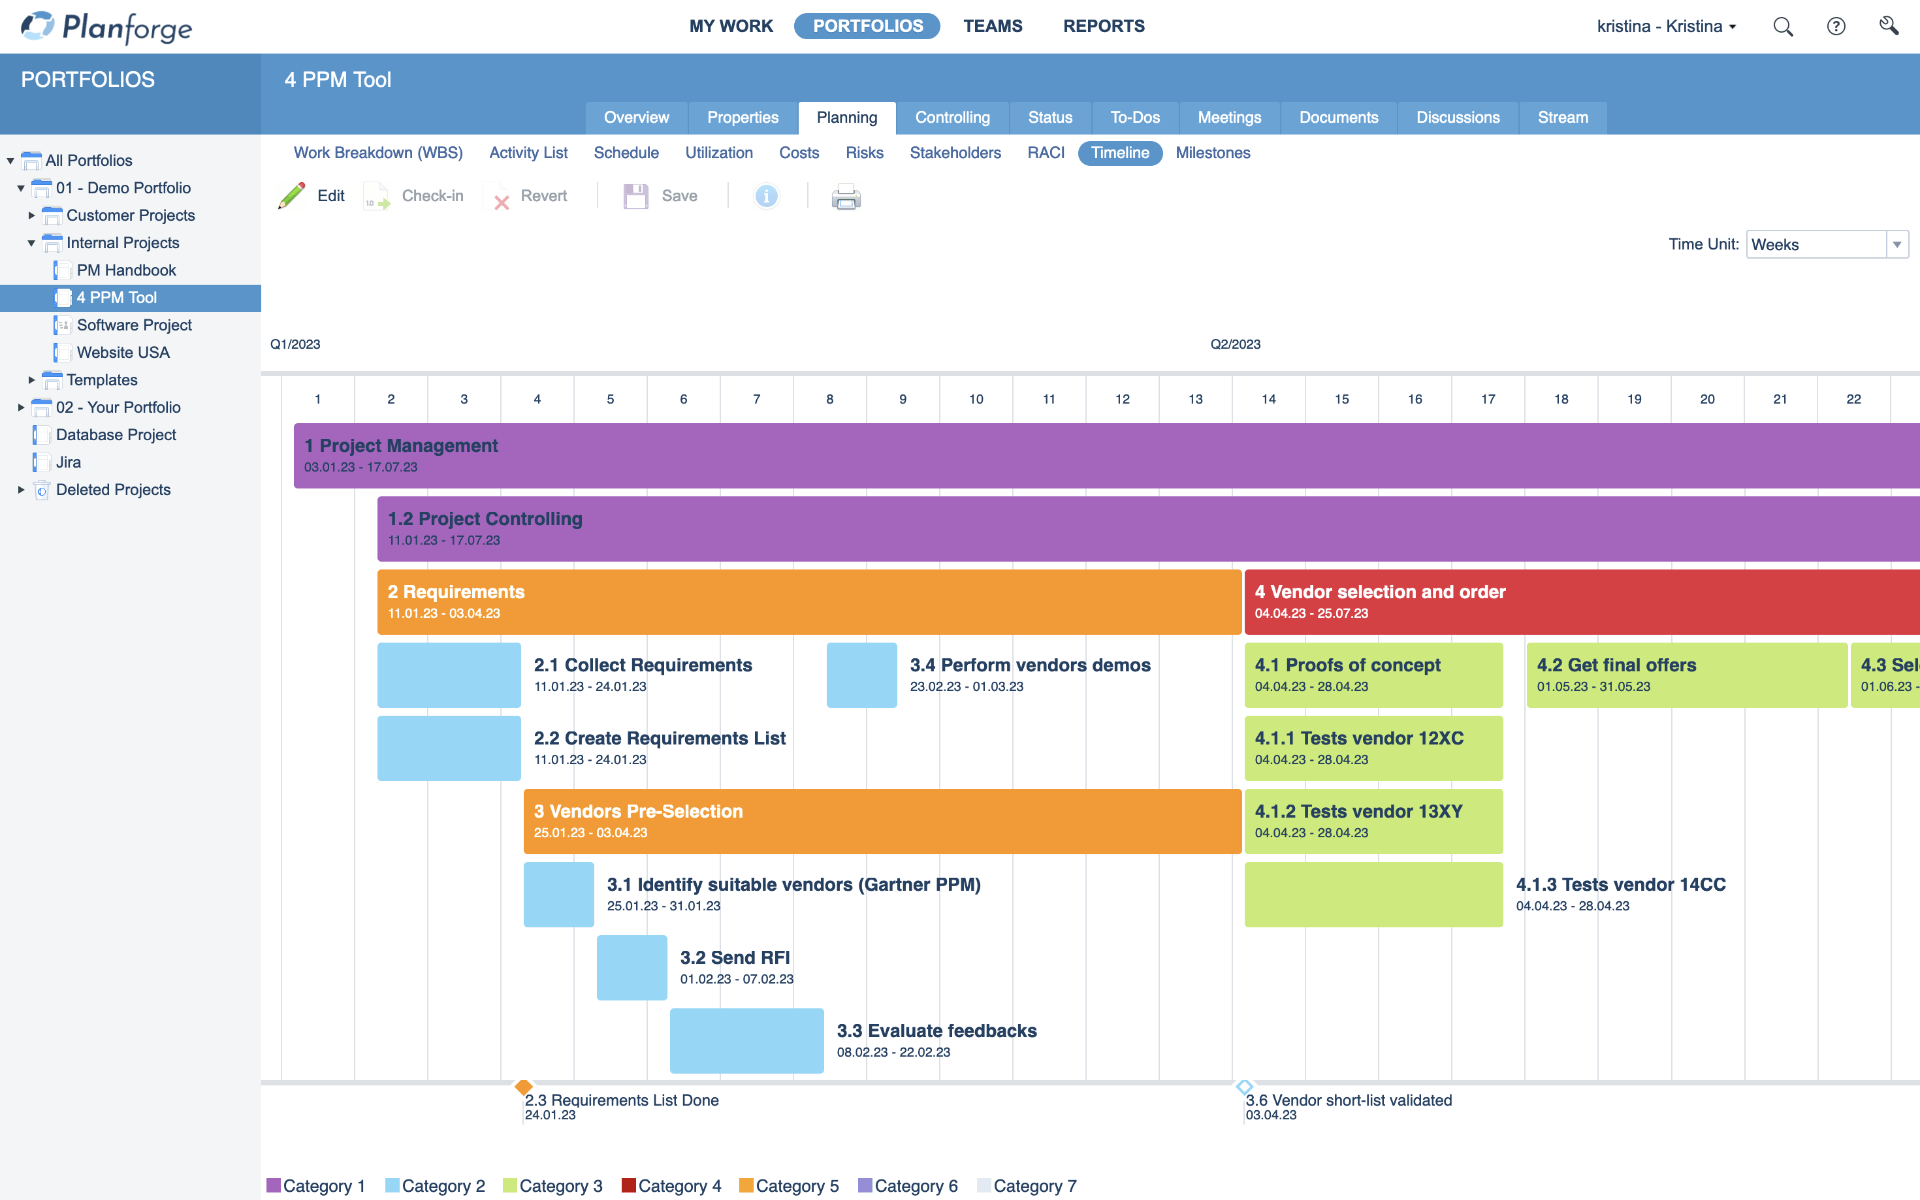
For live reporting traditional projects offer a Timeline view. It allows you to view selected project phases, work packages and milestones in a simplified way to easily present and discuss them during meetings. You can manually add milestones, work packages and project phases to the timeline and plan as you go:
4 Get to know basic project controlling
To make it easy for you to analyze and keep track of your progress, the next steps describe how to track time and carry out basic project controlling in Planforge.
4.1 Tracking time
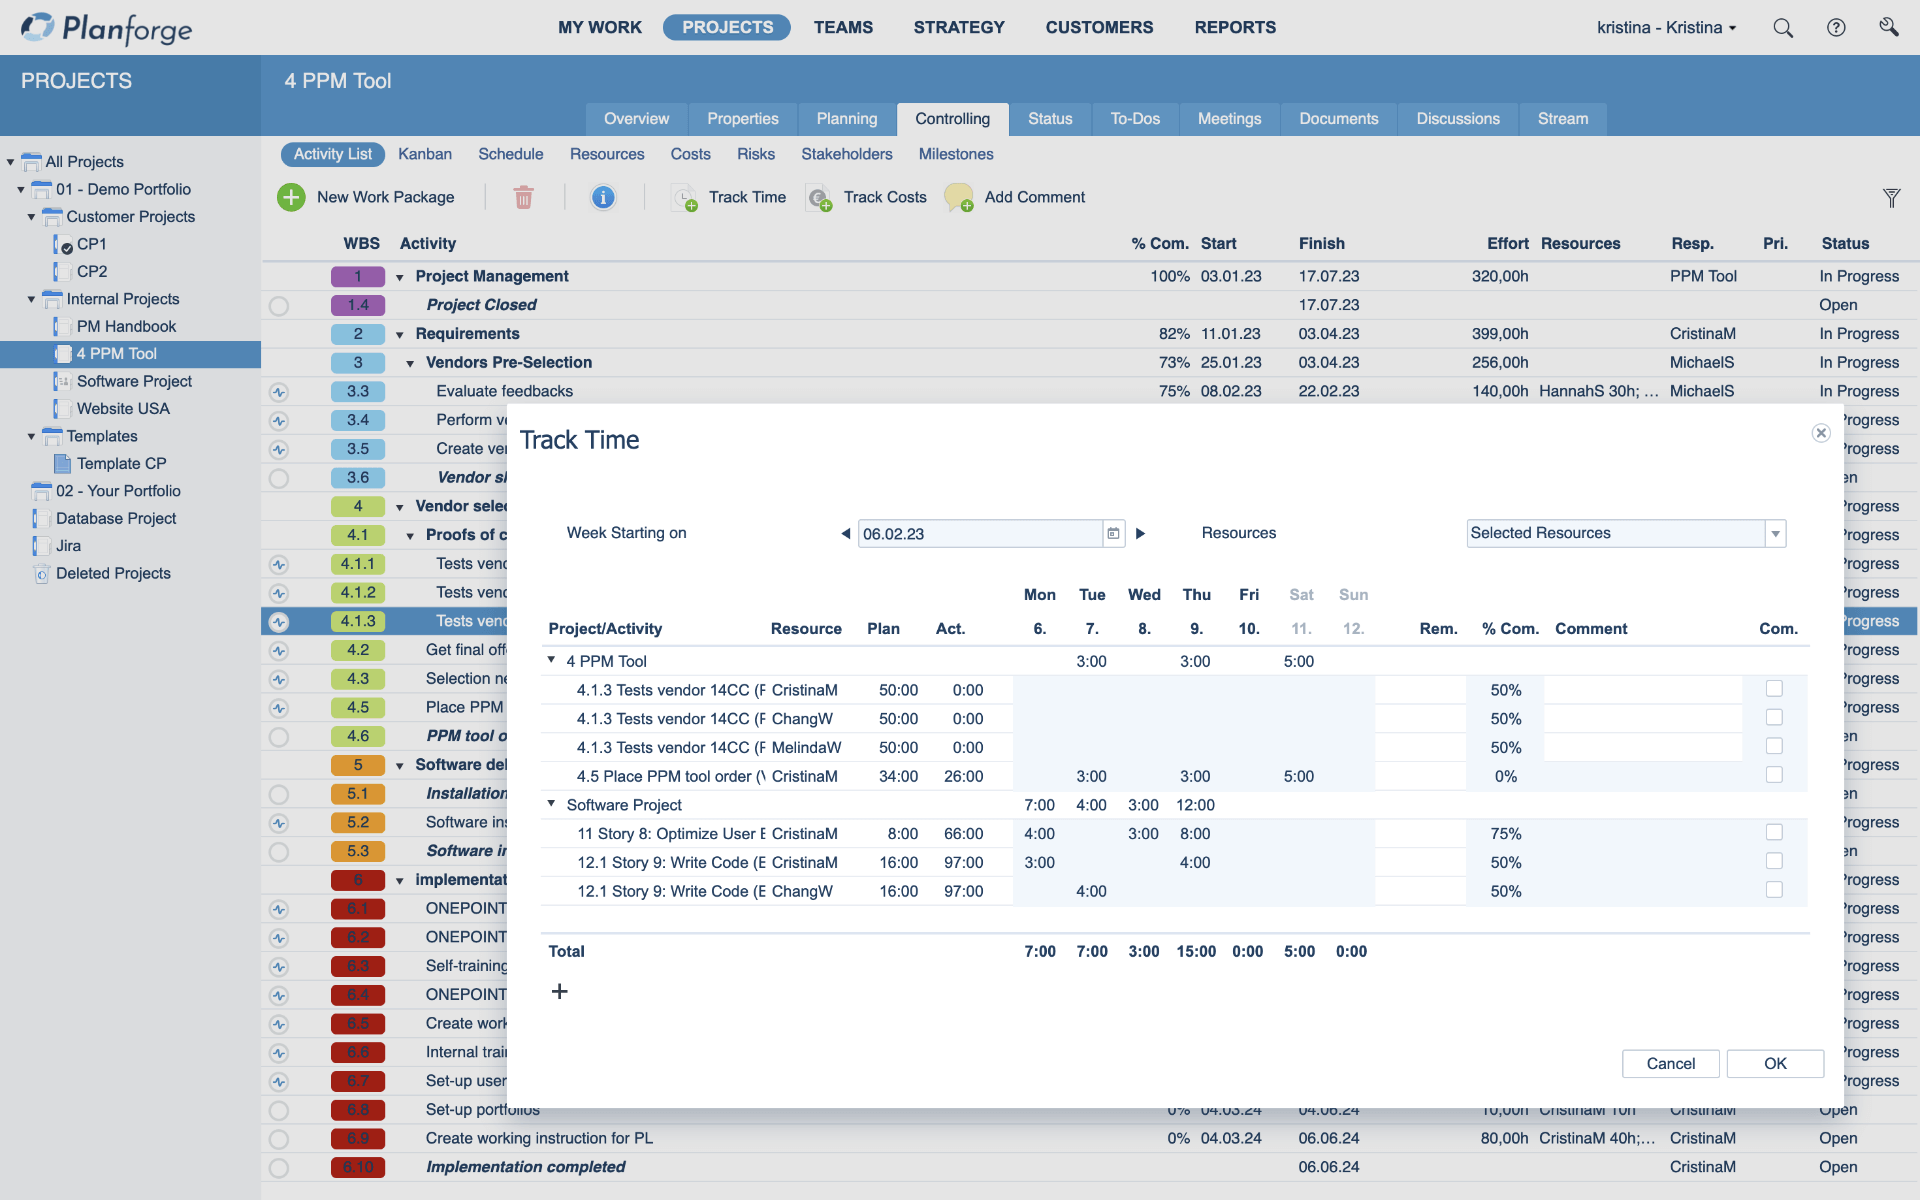
-
Project managers can track time for a project using the quick time tracking functionality. Simply go to the
Activity List
on the Controlling tab and click on the progress icon
 next to the activity you want to track. A dialog opens, in which you can enter effort and achievement of milestones. To track time for multiple activities at once simply select them from the list and click the
 Track Time
button in the toolbar at the top.
Track Time
button in the toolbar at the top.
- Team members can track their actual effort in the same way by going to the MY WORK tool group and selecting the corresponding activities on the My Activities tab.
- The remaining effort and costs are then automatically calculated based on the project plan or the project team's estimations.
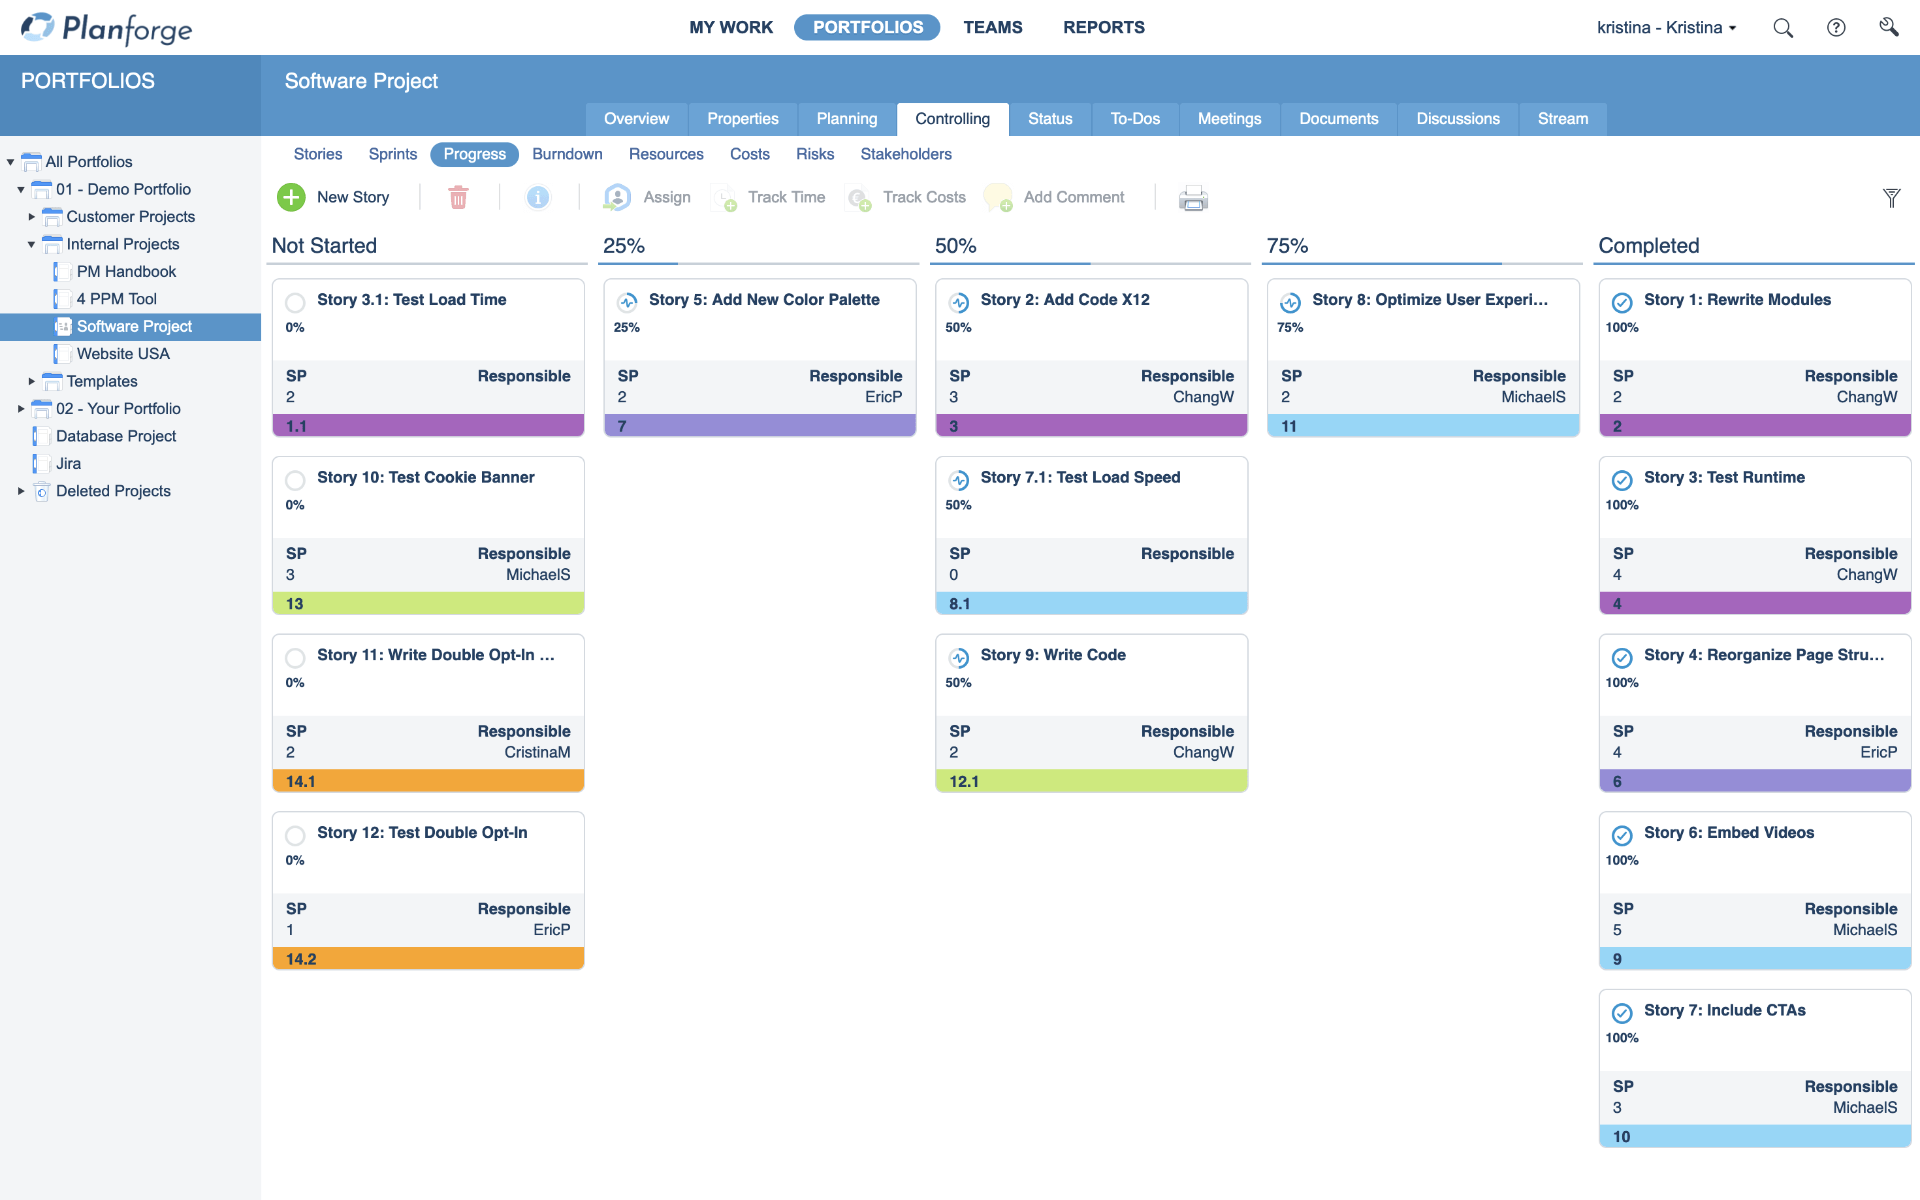
If time tracking is not enabled for a project, you can still track progress in the same way as you would track time and enter the completion degree in %. It is also possible to update progress on the Kanban board by dragging and dropping activities to the corresponding column (e.g. Not Started, 25%, 50%, 75%, Completed):
4.2 Controlling
The Controlling tab in your projects provides you with various tools to visualize and facilitate resource and cost controlling.
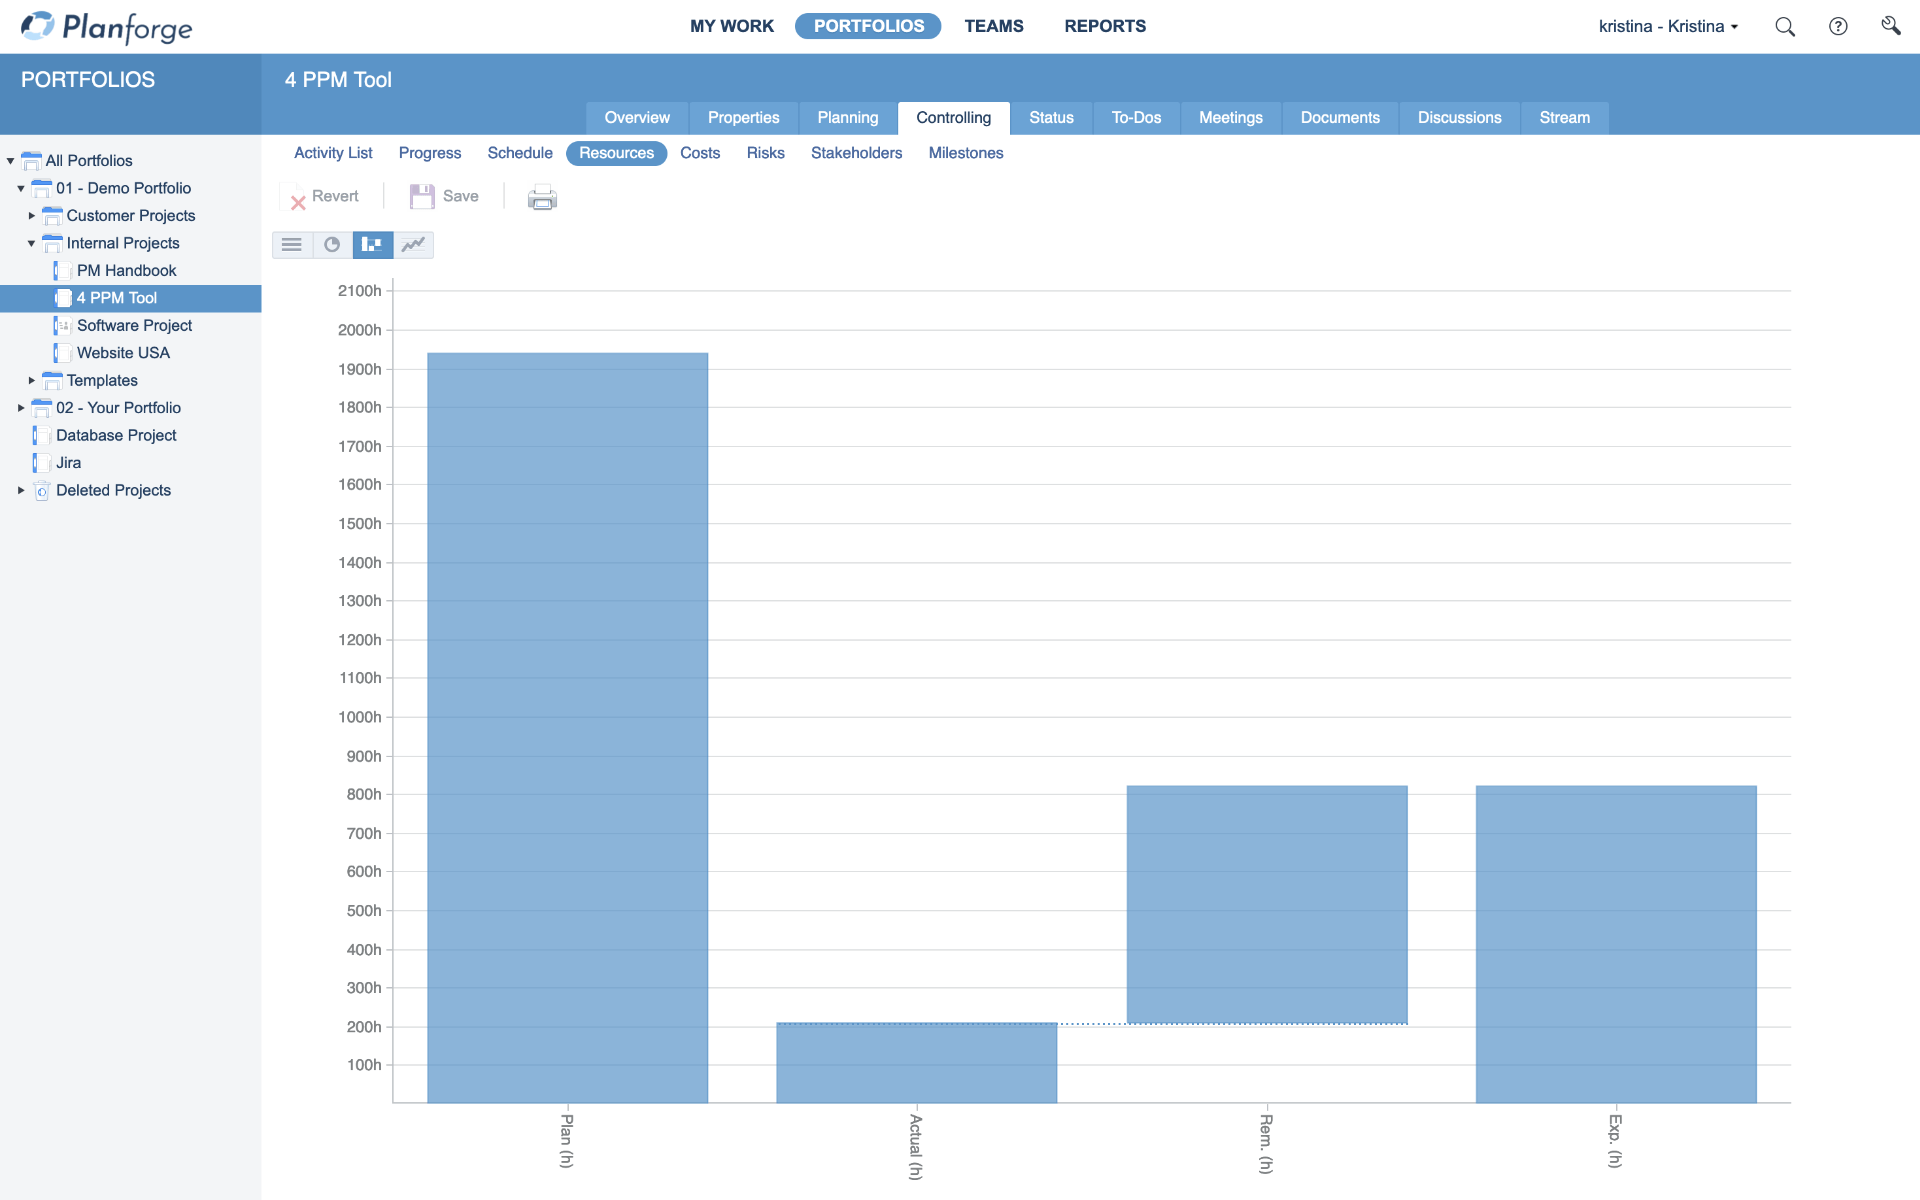
-
Resources
: The resources table
 and plan/actual bar chart
 in the Resources view allow you to easily compare
planned and actual data for the effort of activities and assigned resources
. Project managers can revise and adjust contributor estimations of the remaining effort for each activity in the
in the Resources view allow you to easily compare
planned and actual data for the effort of activities and assigned resources
. Project managers can revise and adjust contributor estimations of the remaining effort for each activity in the
 Progress view.
- Costs : The costs view offers the same functionalities for costs as described for Resources above.
- Traditional projects offer a Schedule view in which project managers can edit plan/actual start and finish dates for the project.
- Agile projects offer a Burndown chart, which shows you the completion of sto ry points compared to the plan and the expected trend.
For even more controlling tools please refer to the Controlling section in the integrated product documentation.
The standard progress mode is % Complete , allowing you to manually enter progress values. It can be changed to Contributor Estimations or Automatic .
For projects using the progress mode % Complete you can disable time tracking in the advanced project properties.
5 Possible Next Steps
Once you have gone through these first basic steps and want to take things further, here are some things you might want to do next:
-
Create project templates to speed up the process of creating projects with similar properties. Simply create a newb
 Template
in the desired portfolio or choose
Template
in the desired portfolio or choose
 Save as Template
from the Properties tab of a project that has all the settings you would like to reuse.
Save as Template
from the Properties tab of a project that has all the settings you would like to reuse.
-
Familiarize yourself with the system settings by clicking on the wrench icon
 in the top right corner of the application. Here you can set many parameters according to your preferences.
- Find out how to customize your Planforge application. For example, in the CUSTOMIZE tool group under Tools you can define custom fields, create calendars, and define workflows.
You need to be a System user to access the system settings.